Miraplacid Publisher
Contents
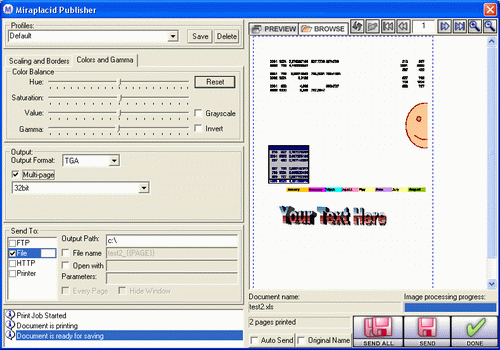
Miraplacid Publisher Dialog
Miraplacid Publisher Dialog appears when you start printing to Miraplacid Publisher
printer. It contains many controls. Good thing is - you do not have to learn all of them.
Just push "Send All" button to save pages of your document as images.
If you want to get maximum from Miraplaid Publisher,
please read Miraplacid Publisher dialog controls description below.
You can start Miraplacid Publisher as a regualr application and configure profiles
before start printing.
Profiles (configurations)
Profiles are for saving and restoring Miraplacid Publisher settings.
Miraplacid Publisher has "Default" profile and some per-defined profiless.
You can save your settings under new profile name.
Just type new unique profile name in profiless drop-down box and push "Save" button next to the drop-down.
To restore saved profile just select it in the Profiles drop-down.
You can delete all the profiles except the Default.
Miraplacid Publisher saves only Default profile on exit.
If non-Default profile selected, it will not be saved unless you push "Save" button.
Scaling and Borders
Scaling and Borders settings located in "Scaling and orders" tab below the Profile section.
Miraplacid Publisher has three scaling algorithms - draft but fast, high quality and best quality, but slow.
To turn scaling off, choose "Disabled" in scaling drop-down list.
You can specify result image size in pixels or in percents of the printed image. Printed image size depends
on DPI settings of the Miraplacid Publisher printer.
We recommend you use "Constrain Proportion" unless you don't care about proportions.
Borders are for clipping a part of the printed page.
There are three options in bordrs drop-down.
"Disable" means, that the image will be save as-is.
"Automatic" means, that Miraplacid Publisher detect white unused borders and clip only relevant part of the page.
Miraplacid Publisher will leave some white space around it. Spave width and height specified in
"Space Width" and "Space Height" textboxes.
"Automatic" means, that you can specify the rectangle you would like to clip and save with mouse.
To flip image vertical and horizontal, check the checkboxes below the scaling settings.
If you check both, image will be rotated 180'.
Colors and Gamma
Colors and Gamma settings located in "Colors and Gamma" tab below the Profile section.
Hue "rotates" image colors.
Saturation makes colors brighter or fade them down.
Value makes image brighter or darker
Gamma changes image gamma. It is similar to Value, but it does not make white gray.
Reset button resets Hue, Saturation, Value and Gamma settings to default values.
Grayscale makes image grayscale.
Invert changes image colors to opposite. It makes white black and vice versa.
Output Format
BMP
BMP is Windows Bitmap format. You can save it as 24-bit RGB or as an 8-bit grayscale.
Multipage mode glues all the pages of the document into a single enormous image.
JPG
JPG (JPEG) is the most popular "lossy" image format. You can specify image quality. Higher quality increase image file size.
Multipage mode glues all the pages of the document into a single enormous image.
PDF
PDF is Portable Document Format. You can specify image quality, document title, creator and author.
Multipage mode creates single multi-page PDF document.
It is not recommended to turn multi-page mode off for this format unless you need every page
of your document to be saved as an individual PDF file.
PNG
PNG is Portable Network Graphic format. You can save it as 24-bit RGB or as an 8-bit grayscale.
You choose compression quality. It is recommended to use "Best" compression unless you are in a hurry.
Multipage mode glues all the pages of the document into a single enormous image.
TGA
TGA is rarely used image format. It is recommended to store image in PNG format instead unless
you have a software that works only with TGA.
You can save image as 32-bit ARGB, 24-bit RGB, 16 bit RGB or as an 8-bit grayscale.
Multipage mode glues all the pages of the document into a single enormous image.
TIFF
TIFF CCITT formats are good for saving faxes.
CCITT 4 compresses better, but some legacy equipment supports only CCITT 3.
TIFF 24-bit RGB is widely used as loss-less color image format.
Besides, you can save your image as grayscale and regular black-and-white.
Multipage mode creates single multi-page TIFF image file.
Send To
You can change several destinations at the same time. For example, you can save image to disk and print it to a real printer.
File
Saves image to disk. You can use File Browser to specify file location.
You can specify file name (check "File name" checkbox and type in File name textbox)
or you can use printed document name as a file name.
You do not have to specify file extension. Miraplacid Publisher will append prorer
file extension for you.
You can add {{PAGE}}, {{DATE}}, {{TIME}}, {{JOB}} and {{IDENTITY}} tags to file name and path.
They will be replaced with current page number, current date, time, print job, and some unique
number respectively.
You can open result images with some application, let's say, with image viewer, or process
them with post-processor. To open every individual image with some software, check "Open with"
and "Every Page" checkboxes. Specify complete image path to the application in the "Open With"
textbox.
Some post-processors, for example, Web Presentation post-processor included into the Miraplacid Publisher,
cannot be run until the last page is printed.
"Every page" checkbox should be unchecked for them. Post-processor will be started once per
printed document. Images list will be saved to file images.lst and loaded from there by post-processor.
Choose "Web Presentation" profile to see an example.
FTP
FTP plug-in sends image to FTP server. Meanings of input fields:
- URL - URL to the resource; should contain server name and optional folder, without filename.
Example: ftp://www.yourcompany.com/publications
- File - filename for the saved file. It may contain {{PAGE}}, {{DATE}}, {{TIME}}, {{JOB}} and {{IDENTITY}} tags to be expanded.
- Passive mode checkbox. Check it if your server is behind a firewall.
- User and Password - login to your server. If not specified, plug-in will try to connect as anonimous.
HTTP
HTTP plug-in POSTs or PUTs image to HTTP (Web) server.
You can switch between POST and PUT modes by Use PUT method checkbox.
If your PUT or POST location is password protected, use User and Password fields.
HTTP plug-in uses Basic authorization level.
If you use password protected saving, plug-in may sometimes send the file twice because most of servers decline the first connection attempt to protected resource.
URL and File fields have different meanings in PUT and POST modes:
PUT mode. URL should contain only server name and destination folder, as in FTP plug-in.
File is a name of destination file, optionally with {{PAGE}}, {{DATE}}, {{TIME}}, {{JOB}} and {{IDENTITY}} tags included.
To use this mode, Web server should support it, and it must be allowed (turned on) on the server.
POST mode. In this mode, URL should contain path to a script (ASP, ASPX, PHP, Perl, CGI or some other kind of active web page), which will receive POST web form from the plug-in.
Example: http://www.yourcompany.com/publications/post.asp.
Content of the form is encoded according multipart/form-data form rules. Form consists of the following two fields:
- File in expanded form is submitted under filename name as usual form field.
- Content (file itself) is submitted under content name as file form field (Content-Type: application/octet-stream).
So, the script should receive content and save it under filename name.
Please, note that writing to the web folder usually forbidden for scripts. Script should save content in location with special permissions (write allowed for web server virtual user).
Here is an example of form receiving script in asp with MSCUpload component:
<%@ LANGUAGE=JScript %>
<html>
<head>
<title>Test POST feature</title>
</head>
<body>
<%
var oUpload = Server.CreateObject("Miraplacid.MSCUpload");
oUpload.ProcessPostData();

var folder = Server.mapPath("/post");
var oBlob = Server.CreateObject("Miraplacid.MSCBlob");
oBlob.LoadFromFile(oUpload.Files("content").TmpPath);
oBlob.SaveToFile(folder+"/"+oUpload.Form("filename"));
%>
</body>
</html>
Printer
You can print the image to a real printer, specific or default. What is the advantage of using Miraplacid Publisher
in this case? First, you can save image you print to disk or upload it to a server. Second, you
can desaturate image or make it brighter to save your printer cartridge. Third, you can print
only the pages you need and only the parts of pages you need.
Uncheck "Fit to page" if you do not want Miraplacid Publisher to scale the image to fit the page.
Output format settings do not affect printing. Meaning, even if you choose JPEG with low qualiy
or black-and-white TIFF, printed page will be good quality and color.
Printer plug-in does not work in multipage mode.
{{DATE}} and {{TIME}} tags
These tags allows you to include date and time information to file names and paths.
They could be represented in two main forms:
- Default (reduced) form: {{DATE}} and {{TIME}}. This form produce date and time in system default format.
- Full (custom) form: {{DATE(date_format_string)}} and {{TIME(time_format_string)}}. This form allows you to get date and time information
in desired form using format string patterns.
If you use spaces to separate the elements in the format string, these spaces will appear in the same location in the output string.
Characters in the format string that are enclosed in single quotation marks will appear in the same location and unchanged in the output string.
Date format string elements:
| Element |
Meaning |
| d |
Day of month as digits with no leading zero for single-digit days.
|
| dd |
Day of month as digits with leading zero for single-digit days.
|
| ddd |
Day of week as a three-letter abbreviation.
|
| dddd |
Day of week as its full name.
|
| M |
Month as digits with no leading zero for single-digit months.
|
| MM |
Month as digits with leading zero for single-digit months.
|
| MMM |
Month as a three-letter abbreviation.
|
| MMMM |
Month as its full name.
|
| y |
Year as last two digits, but with no leading zero for years less than 10.
|
| yy |
Year as last two digits, but with leading zero for years less than 10.
|
| yyyy |
Year represented by full four digits.
|
| gg |
Period/era string. This element is ignored if the date to be formatted does not have an associated era or period string.
|
Time format string elements:
| Element |
Meaning |
| h |
Hours with no leading zero for single-digit hours; 12-hour clock.
|
| hh |
Hours with leading zero for single-digit hours; 12-hour clock.
|
| H |
Hours with no leading zero for single-digit hours; 24-hour clock.
|
| HH |
Hours with leading zero for single-digit hours; 24-hour clock.
|
| m |
Minutes with no leading zero for single-digit minutes.
|
| mm |
Minutes with leading zero for single-digit minutes.
|
| s |
Seconds with no leading zero for single-digit seconds.
|
| ss |
Seconds with leading zero for single-digit seconds.
|
| t |
One character time-marker string, such as A or P.
|
| tt |
Multicharacter time-marker string, such as AM or PM.
|
Preview
Preview window located in the right part of the Miraplacid Publisher dialog.
Use
 and and  buttons
to switch between preview and browse mode. buttons
to switch between preview and browse mode.
Use  , ,
 , ,
 , and , and
 buttons to navigate through the document pages.
Alternatively, you can specify page you wish to preview in a textbox.
It could take couple seconds for Miraplacid Publisher to prepare page for preview. buttons to navigate through the document pages.
Alternatively, you can specify page you wish to preview in a textbox.
It could take couple seconds for Miraplacid Publisher to prepare page for preview.
Use  and and
 buttons zoom the preview in and out. buttons zoom the preview in and out.
You can view detected border in Autodect mode and edit it with mouse in Manual mode.
See Scaling and Borders section for details.
Browse
Browse window located in the right part of the Miraplacid Publisher dialog.
Use
and buttons
to switch between preview and browse mode.
Browse window is attached to Send To: File. When you change a folder in the
browse window, it changes in the "Output path" textbox.
Use button  to create a new folder.
Use button to create a new folder.
Use button  to refresh the browse window. to refresh the browse window.
Information
Information window
Information window located at the very bottom in the left part of Miraplacid Publisher dialog.
It will inform you whether the document has been completely printed, whether there is
a pending printed document, etc. Besides, Miraplacid Publisher uses this window to display
warnings and error messages.
Document Name
This text window is for the original name of the printed document.
Miraplacid Publisher is not guaranteed to display the proper name as long as some applications
do not provide proper document name to printing API.
Pages Printed
When printing is in progress, it displays something like "3 pages, expected: 14".
Total pages is not guaranteed to be accurate as long as Printer Spooler not always
can say for sure how many pages expected. When docuemetn is printed, something like
"14 pages printed will be displayed.
Image Processing Progress
Image processing trackbar displays image scaling, colors and gamma correction, etc progress.
Besides, you can see progress of sending files for every selected destination right
to the destination name.
Auto Send
Auto send checkbox switches Miraplacid Publisher to Auto-Send mode. It processes and sends all the pages of current
document to the specified destinations. Then it does the same for all pending printed documents if any.
Then it waits for the next printed docuemnt, processes it and sends to the specified destinations.
You can minimize Miraplacid Publisher to tray or leave it on a screen - it does not affect Miraplacid
Publisher behaviour.
Original Name
This checkbox disables replacing {{PAGE}} with actual page number for the first page in a document
in File and FTP output destinations.
Send and Send All
 button sends current page to the specified destination(s). button sends current page to the specified destination(s).
 do it for each document page.
Use "Send All" button in multi-page mode. do it for each document page.
Use "Send All" button in multi-page mode.
Done and Hide
Push  button when you are done with current document.
Miraplacid Publisher will start the next pending printed document if any or switch to idle mode.
When Miraplacid Publisher is idle, There is "Hide" button instead of "Done" button. It minimizes
Miraplacid Publisher to tray. button when you are done with current document.
Miraplacid Publisher will start the next pending printed document if any or switch to idle mode.
When Miraplacid Publisher is idle, There is "Hide" button instead of "Done" button. It minimizes
Miraplacid Publisher to tray.
Miraplacid Publisher Tray Icon
To open Mitaplacid Publisher dialog, click the Icon on Windows System Tray

Right click the icon to pop-up the menu. You can turn Miraplacid Publisher to Auto Send
mode and back from this menu. Besides, you can completely exit from Miraplacid Publisher with "Exit" menu entry.
It is recommended to exit Miraplacid Publisher before re-installing it.
See also:
|